
WhatsApp is the most used mobile messaging application acquired by Facebook in 2014. As WhatsApp has over 1.5 billion active users it is a good platform to market your business by sending messages. So in this article, I going to show you how to send bulk messages on WhatsApp using few lines of python code.
There is also an official way to send bulk Whatsapp messages using Whatsapp business API but for that, you need a legally approved business and willing to spend money on automated software.
So in this article, I am going to show you how to send schedule msgs in Whatsapp and send bulk WhatsApp messages using 22 lines of python code.
Contents
Requirements:
The below-mentioned software is mandatory to work this method
First of all, you need to install python 3.7 on your computer, You can go Python official website by clicking here
We recommend using Microsoft VScode to write and execute the code. or you can simply use the default IDE that comes with python software
google chrome browser need to be installed on your computer
Required python libraries
- pyautogui
pyautogui is the graphical user interface(GUI) automation module that uses in python to automate the inputs that humans give from the keyboard and mouse. To install pyautogui, open your python IDE and enter the below-mentioned code
Pip install pyautogui- Pandas
Pandas package is used to read the input data we provide in an excel sheet, to install pandas on your computer, Enter the below code on your python IDE.
pip install pandasHow to automate and schedule WhatsApp messages using python
Now I will show you how to schedule Whatsapp messages, sofar WhatsApp did not bring the schedule messaging feature officially but still, the is a way to setup schedule WhatsApp messages using 2 lines of Python
import pywhatkitwith this line, python will import the PyWhatKit library, which is the best library to automate things in python
pywhatkit.sendwhatmsg('+91 phone number', 'message', hours, minutes)In this line, you have to enter the phone number to whom you want to send the scheduled message, after the mobile number you have to enter the message you want to send in single columns, after that, you have to enter the time when the message to be sent. for example, you want to send messages as Happy birthday at midnight 11:59 am then the code should be like
pywhatkit.sendwhatmsg('+919999999999', 'Happy Birthday', 23, 59)Here is the full code to send a scheduled WhatsApp message
#Make sure you install pywhatkit
import pywhatkit
pywhatkit.sendwhatmsg('+919999999999', 'Happy Birthday', 23, 59)
How to Send Bulk messages with WhatsApp automation using python code
Now you have seen have to write a code to send a scheduled message, now I will show you how to send bulk messages using python, this is very easy to set up if you don’t know about coding and python also don’t worry, follow the steps and do the same, you can successfully do it.
Note: make sure you already login to WhatsApp web in your chrome browser
To make you understand clearly I have divided the full code(22 lines) into 4 blocks, If you want to see the full code you can scroll down to find it
Importing the required libraries:
import pyautogui as pg
import webbrowser as web
import time
import pandas as pd
The pyautogui is the graphical user interface(GUI) automation module that uses in python to automate the inputs.
Webbrowser allows a high-level user interface to display the web-based to you
We are importing time to make Python code wait for few seconds after one message sent So that Whatapps won’t track that we are doing automation
we have imported the pandas to read the input data that will be present on the Excel sheet
data = pd.read_csv("leads.csv")

data_dict = data.to_dict('list')

leads = data_dict['MobileNumber']

messages = data_dict['Message']

combo = zip(leads,messages)
these 5 lines of code say to the system to make the input data (in our case it is mobile numbers and message) combine in zip format to sent to WhatsApp
If you observe the in the first line I have mentioned “leads.csv” it is the name of my excel sheet, remember it may differ for you, So make sure you change the name over there as show in the below picture

as I have mentioned MobileNumber and Messenge on the colons is because I did mention those as heading in my Excell sheet as shown in the picture below
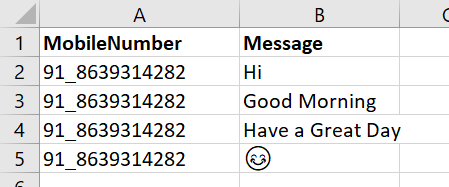
make sure you have to enter the phone number format, as shown above, enter the country code before Underscore (_)
first = True
for lead,message in combo:
    time.sleep(4)
    web.open("https://web.whatsapp.com/send?phone="+lead+"&text="+message)
The reason I added true is first to give time to the system to load the cache of WhatsApp web, in this case, I have given 4 seconds of sleep, which means I said to python wait 4 seconds before running the script.
After the 4 seconds of wait, the python will open the WhatsApp web on your chrome browser
if first:
        time.sleep(6)
        first=False
    width,height = pg.size()
    pg.click(width/2,height/2)
    time.sleep(8)
    pg.press('enter')
    time.sleep(8)
    pg.hotkey('ctrl', 'w')
the time.sleep(6) makes the python script wait 6 seconds before entering the message in the message box
After entering the message the script will wait for 8 more seconds before
sending the messing to the sender
Once the message is sent, it waits for 5 seconds and closes the current WhatsApp web tab, and repeats the step until the list in the excel sheet is over.
Great, we have learned how the code works and now it is time to see the full code.
import pyautogui as pg
import webbrowser as web
import time
import pandas as pd
data = pd.read_csv("leads.csv")
data_dict = data.to_dict('list')
leads = data_dict['MobileNumber']
messages = data_dict['Message']
combo = zip(leads,messages)
first = True
for lead,message in combo:
    time.sleep(4)
    web.open("https://web.whatsapp.com/send?phone="+lead+"&text="+message)
    if first:
        time.sleep(6)
        first=False
    width,height = pg.size()
    pg.click(width/2,height/2)
    time.sleep(8)
    pg.press('enter')
    time.sleep(8)
    pg.hotkey('ctrl', 'w')
Note: Make sure that you have installed pyautogui and pandas before running the code
Make sure that the excell name and heading name are correctly entered, I suggest you to create the excel sheet with the name “leads.csv and use heading as MobileNumber and Message” to not getting any errors while executing
Conclusion
This is how you can simply create a python project that can send bulk messages without having any paid software or WhatsApp API which also costs money to use. If you face any errors while running code or if you have any doubts feel free to comment below, we are happy to help you and a quick note this article is only for the educational purpose and not recommend to do any spam messages if you send the spam messages WhatsApp will block your account.
This is so awesome. Works like a charm!
Your Are Most welcome Harshal 😊
Great work. Can you provide a code to send image along with text in whatsapp.
thank, awesome
I am having an issue when I run the code it sends a message to the first number but when it comes to the second number it writes the message but it won’t send instead of that chrome come with a popup to close the page the following things will not save kind off stuff and as per the code as the time run’s out the tab gets closed but without sending the message
You could certainly see your skills within the article you write.
The world hopes for even more passionate writers like you who aren’t afraid to say how they believe.
All the time go after your heart.
But we cant image format……